The Vegetarian Resource Group Blog

Baltimore Vegan Restaurant Week August 17-26th 2018

Posted on August 16, 2018 by The VRG Blog Editor


Whether you live in Baltimore, MD or are just visiting the week of August 17-26th 2018, you might want to dine out in one of the many restaurants participating in Baltimore Vegan Restaurant Week. Some of the restaurants you can dine at include:
The Land of Kush
Stall 11 in RHouse
Harmony Bakery
Donut Alliance
Golden West Café
Little Havana
Joe Squared
And many other restaurants…

For details on special events being held this week and all the restaurants participating, see: https://www.mdveganeats.com/

Report on Western New York VegFest

Posted on August 15, 2018 by The VRG Blog Editor

Thank you to Karen Peissinger for doing a Vegetarian Resource Group booth at the Western New York VegFest in Buffalo, NY. She was able to help youngsters to retirees. Several grandparents picked up brochures to give to parents to help them feed more nutritious food. Karen was able to assist another person who said that she works with children from 6-years-old to 11-years-old and provides them nutritional education. And a Registered Dietitian picked up VRG Spanish materials for her clients.

Thank you to Karen for her great outreach!

National Vegetarian Museum’s fundraiser in Chicago, IL Thursday, August 16, 2018

Posted on August 14, 2018 by The VRG Blog Editor


This will be a wonderful opportunity to meet other vegetarians and vegans and enjoy 100% plant-based food at Veggie Grill!

The fundraiser takes place on Thursday August 16th, 2018 at Veggie Grill (614 West Diversey Pkwy.) between 4pm and 9pm. You are welcome to join anytime between 4pm and 9pm, so whether you’re an early bird or have to stay late at the office there will be a spot for you! All you have to do when ordering is mention the fundraiser and a third of your purchase will be donated to the museum.

Please share this event and invite your friends and family! Children of all ages are also welcome! Thank you for your support!

See: https://www.eventbrite.com/e/vegan-fundraiser-dinner-at-veggie-grill-tickets-48744502118

Gorgeous Vegan Birthday Cake!

Posted on August 14, 2018 by The VRG Blog Editor

Former Vegetarian Journal Senior Editor Samantha Gendler shared the following: “Thought you’d like to see this cake my mom made my daughter for her first birthday. There are layers of watermelon covered with coconut whipped cream. The whipped cream is died pink with beet juice. The cake is decorated with strawberries.”

Join The Vegetarian Resource Group’s Parents and Kids Facebook Group!

Posted on August 13, 2018 by The VRG Blog Editor

VRG’s Parents and Kids Facebook Group is intended to be a group that offers support for families raising children on vegan diets and for vegan kids. We envision it as a place to get advice about a wide-variety of topics: pregnancy, birthday parties, school lunches, Halloween, non-leather apparel, cruelty-free products, summer camps, and more. Please use it as a place to share your wisdom, seek advice, or just find a sympathetic ear. The goal is to offer support.

Consequently, any profane, defamatory, offensive, or violent language will be removed. Feel free to disagree, but do so respectfully. Hateful or discriminatory comments regarding race, ethnicity, religion, gender, disability, sexual orientation, or political beliefs will not be tolerated. We expect that posts should relate to vegan diets and lifestyles. The Vegetarian Resource Group reserves the right to monitor all content and ban any user who posts in violation of the above rules, any law or regulation, SPAM, or anything otherwise off topic.

Recent discussion topics include:
Video of a 3rd generation vegan being interviewed.
How do you give Vitamin B12 to your toddler?
What do you do when your family says you need to feed your child meat?
What is your child’s favorite plant-based vegan meal?
Plus more!

Please share this information with any veggie families that you know! Thanks.

Filming a vegan recipe video – tips and tricks

Posted on August 10, 2018 by The VRG Blog Editor


By Angelique Complainville, VRG Volunteer and Amy Dell, VRG Intern

One of our projects with The Vegetarian Resource Group was to film a recipe video for The Vegetarian Resource Group website. We produced a video about how to create a classic French lunch, but vegan. A local school at a church was very kind as to lend us their kitchen for 6 hours (from 11am to 4pm) and we used it as our cooking and filming location. We think that we have picked up some tips and tricks during this day to make shooting a video easier, so here they are. You can also find a link to the video at the end of this article.

Before starting to shoot the video, you want to have a clear idea of what you are going to film: which recipes, an intro, and an outro. We would advise against trying out a new recipe while filming. You should make it at home first just to make sure it works (know measurements, cooking time, etc.) and tastes good.

Communication is also key in the beginning stages of the process. You have to work with your team to make sure that everyone’s input is included, so that the final product can be the best it can be. If you are working for an organization, it’s a good idea to run the outline of the project by your supervisor before committing to anything.

To make filming more efficient, we wrote a script of what we were going to say and the order in which we were going to film the recipes. For example, one of our recipes had a 2-hour cooking time so we decided that we would tackle it first and film the rest of the recipes while it was cooking. We also chose to film the intro and the outro before doing any cooking. That way we didn’t have to worry about it in case we were running out of time after cooking everything, plus the kitchen looked nice and clean. For the intro and the outro, we would really recommend learning/reading your script beforehand; that way you don’t have to film as many takes. But they do make fun bloopers.

After finishing the script, we made a shopping list of all the items we were going to need to purchase as well as all the utensils we needed to bring. This is especially important if you are not cooking in your own kitchen and it might not have what you need. Here is what I learned from forgetting a key ingredient: make a last minute checklist of everything you need to bring and make sure you have everything before leaving. My mistake was forgetting to check the freezer. Also, this might seem like a no-brainer but make sure your camera is fully charged and bring your charger just in case. A tripod could make filming easier especially with the intro and outro. Ours was broken so we just used what we had on hand to create a makeshift tripod.

If you don’t have a camera, you can use your phone or ask family and friends if they have one you can borrow. It’s a good idea to do this well ahead of time so that you have time to find what you need. If you’re contacting a business/organization to use their kitchen to film, you also want to do that well ahead of time to make sure they still have a date available, and make sure to allow more time than you think you’ll need, just in case something goes wrong.

We would recommend having at least two people when making a recipe video. While one is cooking the other one can be filming. We took turns so both of us would be in the video. That being said if you are by yourself we really think that having a tripod would be really helpful to get nice shots.

To make editing easier, don’t film everything. For instance, if you have to chop a lot of veggies, just film yourself chopping one and explain in the voice-over how many you actually need to chop. The video would be very long and quite boring if it showed all the process. That said, make sure you don’t skip any key parts in the recipe.

When editing, you can also speed up the chopping and preparation of the ingredients. This makes the video quicker and holds attention better. Try adding music to the background so that the video is more interesting.

Last but not least have fun while filming, and experiment with new filming techniques and different angles. You can also choose to talk while filming or record a voice-over as you are editing the video. I would definitely recommend filming more shots that you think necessary so that when you are editing you can pick your favorite ones and delete the blurry ones.

This is a fun project to do as part of an internship, or just because you want to share your vegan recipes with others. You don’t need fancy equipment or a professional kitchen to make a recipe video. Anyone can do it. As long as you enjoy yourself, this is a worthwhile project!

You can watch our video here: https://youtu.be/vmRhqpU9f8I

Mac & Moon Brings Vegan Macarons to New Orleans

Posted on August 09, 2018 by The VRG Blog Editor


By Keryl Cryer

I’ve watched enough baking competition shows to know that it’s hard to perfect French macarons – those round, meringue-like, and often brightly colored sandwich cookies served at bridal showers and tea parties. Now, imagine what it must take to develop comparable vegan and gluten-free versions. Not only has Mac & Moon conquered this remarkable culinary feat, but its ‘karmacarons’ are gaining momentum in notoriously decadent but historically vegan-inhospitable New Orleans.

On a recent trip home, I visited the upscale Auction House Market food court and made my way to Mac & Moon’s counter against the far wall. Within a glass display case, I discovered a pastel confectionary rainbow, with salmon-hued Strawberry Cheesecake, golden Champagne, viridescent Matcha, and delicate Lavender. Not surprisingly, it was difficult to limit my selection to the half a dozen that packed my purple takeout box.


My favorite varieties were the Mojito, with its vibrant lime filling, and the Cherry Pie, which had a prominent fruit flavor and a drizzle of white icing on top for a finishing touch. Still, there was not a bad variety in the bunch. The Tangerine Dream delivered a refreshing citrus burst, while white nonpareils and a festive blue filling livened up the Birthday Cake. The Cookies & Cream was notable for its prominent vanilla flavor and cookie-flecked filling. Even the pale blue Plain Jane was patently delicious. Maybe the next time I’m in town, I can sample other recipes featured on Mac & Moon’s Instagram, such as Red Velvet Cake, Lemon Blueberry Basil, Hibiscus, and the recently added Chocolate Caramel Pretzel.

A word of caution for those with nut allergies. Like many other macarons, all of Mac & Moon’s varieties are made with almond meal. That doesn’t mean you can’t indulge there, though! Mac & Moon offers ample nut-free options, all of which are vegan and gluten-free. If you need to cool off from that infamous NOLA humidity, you can choose among milkshakes, frozen teas and lemonades, and jasmine rose bubble tea. Mac & Moon has also embraced crazes like rolled ice cream and bubble waffles, both of which contribute to endless combinations of sweet possibilities.

Mac & Moon’s home, the Auction House Market, is conveniently located on the corner of Magazine and Julia Streets in the Arts District (formerly the Warehouse District). It is mere blocks of the National WW II Museum, the Contemporary Arts Center, the Ogden Museum of Southern Art, and the Louisiana Children’s Museum. (It’s also only one block from my favorite vegan-friendly Big Easy eatery, Carmo.) In addition, it is only a short streetcar or taxi ride from the Superdome, the French Quarter, and many downtown hotels.

While the Auction House Market is open from breakfast to late night, Mac & Moon’s hours are more limited. You may want to contact Mac & Moon’s owner, Kristina Ostrom, at 504-323-9727 or [email protected] about that day’s hours, as well as questions about wholesale orders and catering.
Also see: https://www.instagram.com/macandmoon/

Support The Vegetarian Resource Group Year-Round – Become a Monthly or Quarterly Donor!

Posted on August 09, 2018 by The VRG Blog Editor

The Vegetarian Resource Group is an activist non-profit organization that does outreach all-year-long. For example, VRG tables at different events throughout the USA and also sends literature free of charge to other groups/individuals doing educational activities in schools, hospitals, camps, restaurants, libraries, etc. Our ability to continue doing this depends on people like you! Your donations allow us to promote the vegan message whenever we’re called upon for assistance. Please consider becoming a monthly or quarterly donor to The Vegetarian Resource Group.

Thanks so much for your support. You can become a monthly or quarterly donor online here: Donate to The Vegetarian Resource Group

Ashley’s Vegan (Gluten-Free) Wedding Cake

Posted on August 08, 2018 by The VRG Blog Editor

By Rissa Miller

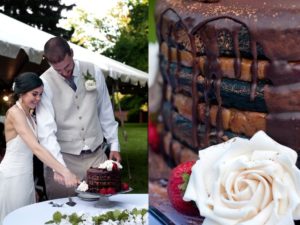
The sensation of falling, hurtling through time and space, and landing… in chocolate. The silky fondant surface mashed into my cheeks and eyes. The aroma of decadent dark cake and peanut butter crowding out the gasps of people around me…

I snapped awake, heart pounding, cold sweat soaking my hair. Another anxiety dream about Ashley’s wedding cake. Grabbing my phone from the bedside, I saw it was 3am and still one week away. In a few days, though, I would begin the four-day process of baking, assembling, and decorating a vegan wedding cake for my friend Ashley and her soon-to-be husband David. I’m willing to bet that I was more nervous than the bride, groom or any member of their families.

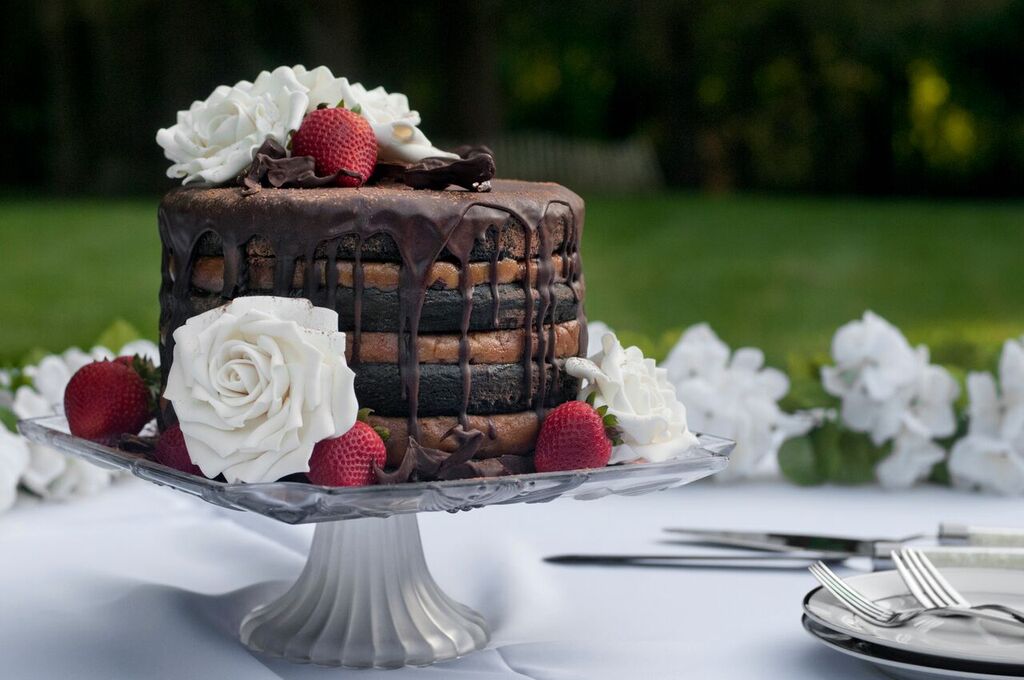
Rewind nine months from June to Halloween, my favorite holiday. I decided to make a fancy, spooky cake to take to a friend’s party. Because I love baking experiments, this occasion was fun. I made a four-layer cake with black cocoa – a new ingredient to me. Each bite was the richest raven tone, moist and chocolatey. Instead of usual frosting, I made peanut butter candy filling and folded in chopped vegan peanut butter cups for the layers between the cakes. It was Halloween, after all, and even a dessert should be wicked. After a thick layer of chocolate ganache set on the cake, I melted vegan marshmallows and pulled them into long sticky strands, wrapping the concoction in what looked like cobwebs.

When putting the cake together, I placed a two inch plastic spider into the candy layer. My intention was to make the cake itself into a game, like a Mardi Gras King Cake. A rhyme was placed next to the cake plate and whoever found the spider was to get a prize. But my spider’s web did not catch a winner that night… instead, it snared me in the success of my own creation.

Longtime friend Ashley was in attendance and moments after my cake was selected as “best dish” at the party, she approached, told me she loved the cake, and asked if I could recreate it as her wedding cake. I’m pretty sure I laughed out loud. I’m not a professional baker, I didn’t use a recipe, and the pressure of making a wedding cake – the centerpiece of a couple’s reception and a family’s time-honored, treasured dessert – was well outside my wheelhouse. I declined.

Ashley was not deterred, however. She continued to ask me to make her cake over and over and finally, three months later, I agreed to try and make the cake, but only if she had a plan B, in case I failed on the day-of. Vegan/gluten-free baking has its challenges, plus a wedding cake needs to be gorgeous and delicious. Since most of her guests were neither vegan nor gluten-free, an extra coating of stress was rolled on. I really didn’t want people saying things like “Oh, it’s not bad for being vegan/gluten-free.”

Taking meticulous notes, I made the cake four more times over the spring to refine the recipe. Luckily, I know a hungry vegan running team, and they ate all the samples for me – thank goodness! They were also great with feedback on the texture, flavor, and crumb of the cakes.

Despite all this work and preparation, my anxiety persisted. As a former wedding photographer, I knew firsthand the myriad things that could go wrong with a cake. One variation to the baker’s chemistry and the entire thing could taste like a chocolatey sand blob. In hot weather, cakes can sweat and collapse. Then there is the dreaded dropped wedding cake – no Halloween fright can compare to the horror of watching a stunning wedding cake topple to the ground. No matter how carefully I checked my notes, supplies and lists, the dreams came. Nightmares of my beautiful creation flopped onto the dance floor or in the lawn just moments before Ashley and David were supposed to cut in, their traditional first task as a couple.

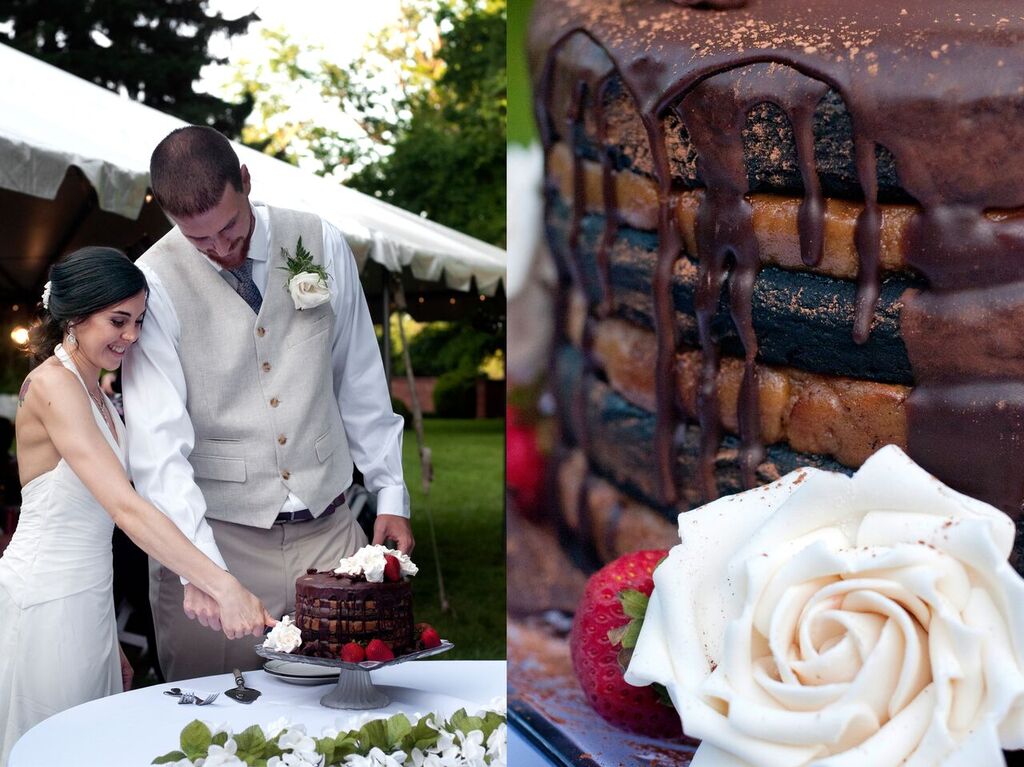
The hard work and planning paid off though. With Ashley’s mom Denise, as well as four dogs and a cat, keeping me company (i.e., keeping me calm), I made the cake in a four day process. It was transported via my husband’s Prius and adorned the reception with a stunning chocolate centerpiece. From the edges of the tent, I quietly observed as guests cleaned their plates – despite the vegan/gluten-free status – and yes, I even saw one man lick his cake plate. That’s kind of an awesome compliment.

Additional acquaintances have since asked if I would bake wedding or birthday cakes for them, but the answer is firmly no. I tasted the sweetness of success this time, however, the lost sleep and anxiety were more pressure than I am interested in reliving. There are wonderful vegan/gluten-free bakers who want that business and I want them to have it. I’ll always hold this memory though, the months and weeks it took to perfect and create a friend’s once-in-a-lifetime dessert. While I never wanted to bake a wedding cake, I can’t say I regret it. I don’t. It was a better gift than I could have bought to buy them and a luscious way, baked with love, to start their married life.

Here’s the recipe:

Ashley & David’s Vegan and Gluten-free Wedding Cake (originally the Halloween Layer Cake)
Makes 45-50 wedding-size cake portions

Dark Chocolate Cake Layers

To prepare four 10-inch cake pans:
Vegan margarine (Earth Balance used)
Black cocoa powder, for dusting pans

Dry Ingredients:
3 cups 1:1 Gluten-Free Flour Blend (King Arthur Flour blend used)
2 cups vegan sugar (Florida Crystal used)
1-1/2 cups black cocoa powder (King Arthur brand used)
1/4 cup almond flour
3 Tablespoons instant coffee powder
3 Tablespoons Ener-G Egg Replacer
1 Tablespoon psyllium husk powder
1 Tablespoons baking soda
Pinch salt

Wet Ingredients:
2-1/2 cups unsweetened plain soy milk, room temperature (Westsoy used)
1-1/2 cups warm water
1/2 cup canola oil
2 Tablespoons apple cider vinegar (Bragg’s used)
2 teaspoons vanilla extract

Preheat oven to 350 degrees.

Grease four 10-inch cake pans with vegan margarine and dust with cocoa powder.

Sift together all dry ingredients in a large mixing bowl. Whisk dry ingredients to further combine and lighten, about 30 strokes. This adds air and makes the cake texture lighter.

In a second bowl, combine all wet ingredients and stir until smooth. Add to dry ingredients and whisk until well combined, about 50-60 strokes.

Pour evenly into prepared cake pans and bake at 350 degrees for 20 minutes, rotating oven rack positions once during baking.

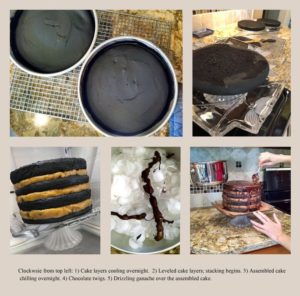
Allow cakes to cool completely, at least four hours and up to overnight in their pans on cooling racks. When ready to trim, the cooled cakes will drop easily from the pans. Handle carefully, so they do not break.

Before assembling with peanut butter candy layer, use a long serrated knife to trim the mounded tops of the cake flat. This step is optional, however, the assembled cake will be unsteady if the layers are not leveled.

Keep those extra cake scraps! They’re delicious crumbled over non-dairy ice cream, added to a chia pudding parfait, or to just munch on them as-is!

Peanut Butter Candy Filling Layer

4 cups creamy/smooth peanut butter, room temperature (not the natural kind, it won’t work!)
2 teaspoons vanilla extract
1 stick vegan margarine, room temperature (Earth Balance used)
3/4 cup unsweetened plain soy milk, room temperature (Westsoy used)
4 cups organic powdered sugar
4 two-packs of vegan dark chocolate peanut butter cups candies (Justin’s used)

Unwrap the peanut butter cups and using a chef’s knife, chop the candies into small pieces on a cutting board, about the size of pebbles. Set aside.

Add peanut butter, vanilla, margarine and soy milk to a large mixing bowl and using an electric mixer, beat until well combined and creamy, about 2-5 minutes. Gradually, sift in one cup of powdered sugar at a time, mixing between each cup to thoroughly blend the filling. When all the powdered sugar is incorporated, scrape in the chopped peanut butter candies. Using a wooden spoon or sturdy spatula, gently fold the candy pieces into the peanut butter filling.

To assemble the cakes, you’ll need the cake plate and food-safe dowels or extra-long lollipop sticks.

First, dollop one heaping teaspoon of the peanut butter filling onto the middle of the cake plate and mash it flat. Carefully transfer the first cake layer and center it on the serving plate, using the peanut butter filling as “glue” to hold it in place.

Next, using three equally sized bowls or working on a counter covered in parchment, separate the remaining peanut butter filling into three identical ratios. Set two portions aside and gently top the first cake layer on the plate with peanut butter candy filling.

Using your hands, carefully mold/flatten the peanut butter layer onto the layer, making sure the top is totally level and the sides are neat with minimal overhang. When you are satisfied with the look of the peanut butter layer, top with another cake layer. Repeat until you have used all the cakes and portions of peanut butter filling. There should be cake on the bottom and top with two layers of cake and three layers of peanut butter filling in the middle. Be sure to build straight up, as a tilted cake is sure to fall during transport.

To secure your cake, use three or four food-safe dowels or extra-long lollipop sticks as “support beams” in the cake. Trim them to match the height of the cake and simply push the rods through all the layers from the top of the cake. This step is optional, but if you plan to move the finished cake, it will give the confection additional strength during the car ride or while being carried. If you plan to serve it outdoors during the summer months, this step is highly recommend.

At this point, stop working and chill the cake overnight in the fridge. Both the cake and peanut butter filling layers will tighten up and become more secure in the cool air.

Chocolate Ganache Topping

One 13.5 ounce can full-fat, unsweetened coconut milk (Native Forest Classic Organic used)
1 teaspoon vanilla extract
Two 9 ounce bags vegan chocolate chips (Enjoy Life Mini Chips used)

In a saucepan over low heat, warm the coconut milk and vanilla together until just simmering, but not boiling. Remove from heat and immediately add all chocolate chips. Stir briskly until they melt into the coconut milk, making a thick, shiny ganache that seems glossy when you look at it in the light. There should not be any lumps of chocolate.

To decorate the cake, remove from fridge and carefully spoon or ladle the ganache over the cake in a way that looks appealing to you. You can use it all, or just what you need. If you used dowels or sticks, be sure to cover the parts on the top where they are visible.

When the ganache is on the cake, place back in the fridge and allow to set, at least 2 hours and up to overnight.

Other cake decorations are up to you! Fresh strawberries, raspberries, and blueberries would all be gorgeous. On Ashley’s cake, fondant roses where used (purchased from an Etsy vendor who makes vegan cake decor), as well as fresh strawberries, a sprinkle of light-toned cocoa and chocolate twigs.

Chocolate twigs are simple to make. Fill a low, flat dish (like a pie pan or cake pan) with ice cubes and set aside. Melt about half a bag of chocolate chips in a microwave on low power for 15 seconds and sit. Repeat the 15 seconds on low power until smooth and liquid. Don’t overcook! Once the chocolate is melted, use a spoon to drizzle long lines of chocolate over the ice cubes. This will create bumpy, irregular chocolate twigs. They will set up almost instantly. Keep chilled.

The finished cake should be refrigerated until ready to serve.

My experience as a Vegetarian Resource Group Volunteer

Posted on August 07, 2018 by The VRG Blog Editor


Angélique is on the left in this photo.

By Angélique Complainville

At the end of last Summer as I was about to start the most intense year of my academic career I needed something to look forward to. I was looking for things to do during the summer of 2018 when I came across The Vegetarian Resource Group website and saw that they were looking for volunteers. I wasn’t very hopeful that I would be able to volunteer considering English wasn’t my mother tongue (I am French) and I would only be able to stay for 3 weeks. But after reading about their mission and what past interns had to say about their experience I knew I had to take a chance/at least try. So, I emailed Charles, one of the Co-Coordinators, and he said that I could come and volunteer and he was so helpful.

Fast forward to the 11th of July when I landed in Baltimore and met Charles and Debra, the Co-Coordinators. They were both so welcoming, asking me questions and showing me the different streets in Baltimore as they drove me to where I would be staying. The next day I started my volunteering with a tour of The Vegetarian Resource Group office where Charles told me about how they went from a grassroots organization to the national nonprofit they are today. He gave me copies of all the books they had written and published as well as all the educational pamphlets the organization has created over the years. I actually recognized one I had used when I first went vegan called “Vegan Diets in a Nutshell.” As a future business student, it was really interesting talking to Charles about the business aspect of running a nonprofit as I possibly want to work at one once I finish college.

I volunteered for 3 weeks and I think that what made this volunteer experience so fun was all the projects I got to work on. I wrote two articles that related to France and veganism. I loved working with Debra on those because she was so encouraging and always had fun stories to tell. My favorite project was definitely the cooking video I did with Amy, a fellow intern turned friend. We spent the day filming and laughing especially while making crêpes. Every single week I had new projects to work on that were very diverse, from writing an article to running a booth through filming a cooking video. There never was a dull moment.

Also, on one of my last days, the VRG received new vegan products to review. I was so happy to have the opportunity to try new vegan products because we don’t have that many in France. I got to try vegan pot pies by Alpha Foods and write a review on them and let me tell you I wish I could smuggle them home because they were so yummy. It was a really fun moment because we all went to the kitchen and tried them, as well as some nutritional yeast seasonings that Amy was reviewing.

I really enjoyed my time as a VRG volunteer because I made some great connections with other vegans, which is terrific considering I don’t have this opportunity in France. I love that Debra and Charles gave me projects that suit my interests. They really make each volunteer experience so unique. Even though I only interned for three weeks contrary to some volunteers who work there for months, I still feel that I got the full nonprofit experience. Everyone I worked with made my time here that much more special. If you are thinking about volunteering with the VRG, do it. They will welcome you with open arms.

For more information on volunteering or interning, see:
https://www.vrg.org/student/index.phpp
https://www.vrg.org/getinvolved.php

To support The Vegetarian Resource Group education and outreach, donate at Donate to The Vegetarian Resource Group

  • Donate

  • Subscribe to the blog by RSS

  • VRG-NEWS

    Sign up for our newsletter to receive recipes, ingredient information, reviews of new products, announcements of new books, free samples of products, and other VRG materials.

    Your E-mail address:
    Your Name (optional):


↑ Top